ADVISOR Gold - American Messaging
ADVISOR Gold - American Messaging
ADVISOR Gold - American Messaging

You also want an ePaper? Increase the reach of your titles
YUMPU automatically turns print PDFs into web optimized ePapers that Google loves.
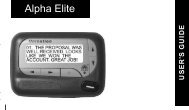
A<br />
<strong>ADVISOR</strong> ® <strong>Gold</strong><br />
<strong>ADVISOR</strong> ® <strong>Gold</strong> FLX<br />
USER’S GUIDE<br />
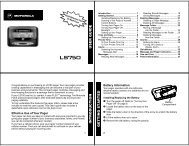
<strong>ADVISOR</strong> <strong>Gold</strong> or <strong>ADVISOR</strong> <strong>Gold</strong> FLX Pager<br />
Congratulations on purchasing either an <strong>ADVISOR</strong><br />
<strong>Gold</strong> or <strong>ADVISOR</strong> <strong>Gold</strong> FLX pager by Motorola ® . Your<br />
new pager provides exciting capabilities in messaging<br />
and can become a vital part of your business and personal<br />
life. The pager’s four-line display and expanded<br />
functionality incorporate many of the most advanced<br />
electronic, communication, and wireless technologies<br />
available. It is reliable, convenient, and designed for<br />
easy operation.<br />
These operating instructions explain how to use your<br />
pager and provide helpful suggestions for first-time<br />
and experienced users.<br />
Exciting FLEX Technology by Motorola<br />
The <strong>ADVISOR</strong> <strong>Gold</strong> FLX pager uses the latest in<br />
paging—FLEX TECHNOLOGY. This technological<br />
advance extends battery life up to five times longer<br />
than ordinary pagers, saving you time and money. As<br />
a Motorola FLEX pager user, you can feel more<br />
confident in receiving your pages because FLEX technology<br />
improves the ability to receive pages. FLEX<br />
technology has been developed by Motorola, the<br />
leader in paging innovation and quality.<br />
Along with FLEX technology, this compact pager uses<br />
many advances in electronic and wireless technology<br />
which allow you to receive text and numeric messages<br />
instantly and affordably.<br />
Getting the Most from Your Pager<br />
• Spend a few minutes learning all of the functions<br />
and messaging capabilities of your pager.<br />
• Give your pager number to your business associates,<br />
friends, family, children’s school, and the babysitter<br />
so you can always be reached in an emergency.<br />
• Include your pager number on business cards and<br />
on your answering machine message.<br />
1<br />
ii<br />
Contents<br />
Page<br />
<strong>ADVISOR</strong> <strong>Gold</strong> or <strong>ADVISOR</strong> <strong>Gold</strong> FLX Pager............1<br />
Exciting FLEX Technology by Motorola.......................1<br />
Getting the Most from Your Pager ...............................1<br />
Display Symbols .........................................................2<br />
Controls ......................................................................2<br />
Pager Symbols............................................................3<br />
Turning Your Pager On ................................................4<br />
Turning Your Pager Off ................................................4<br />
Receiving and Reading Your Messages......................5<br />
Using the Function Menu ............................................6<br />
Backlighting.................................................................6<br />
Locking and Unlocking Messages ..............................6<br />
Setting the Time and Date ..........................................7<br />
Setting the Alarm ........................................................8<br />
Setting the Message Alarm.........................................9<br />
Setting the Alert Mode ..............................................10<br />
Setting the Alert Pattern............................................10<br />
Turning the Maildrop Alert On and Off ......................11<br />
Deleting Messages from Memory.............................11<br />
Moving Messages to Your Notebooks .......................12<br />
Deleting Messages From Your Notebooks ................13<br />
Setting Auto On/Off...................................................13<br />
Other Features..........................................................14<br />
Battery Information ...................................................15<br />
Care of Your Pager ....................................................16<br />
Cleaning Your Pager..................................................16<br />
Repair and Maintenance...........................................17<br />
Patent Information.....................................................17<br />
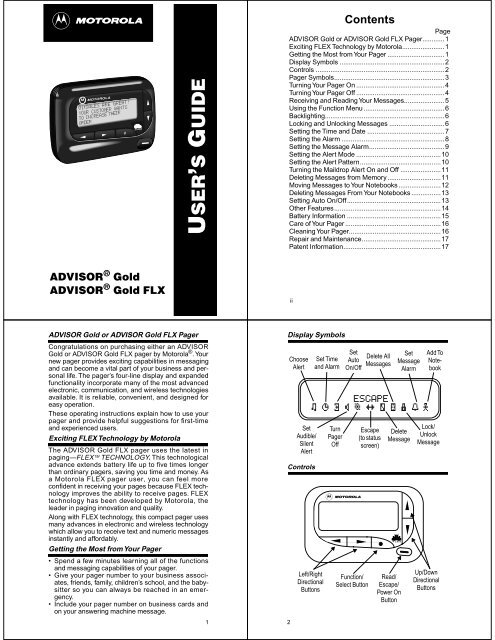
Display Symbols<br />
Controls<br />
2<br />
Choose<br />
Alert<br />
Set<br />
Audible/<br />
Silent<br />
Alert<br />
Set<br />
Auto<br />
On/Off<br />
Set<br />
Message<br />
Alarm<br />
ESCAPE<br />
È Ñ å É ó ò ï ñ í Ö <br />
Left/Right<br />
Directional<br />
Buttons<br />
Set Time<br />
and Alarm<br />
Turn<br />
Pager<br />
Off<br />
A<br />
Delete All<br />
Messages<br />
Escape<br />
(to status<br />
screen)<br />
Function/<br />
Select Button<br />
Delete<br />
Message<br />
Read/<br />
Escape/<br />
Power On<br />
Button<br />
Add To<br />
Notebook<br />
Lock/<br />
Unlock<br />
Message<br />
Up/Down<br />
Directional<br />
Buttons
Pager Symbols<br />
Pager Status Symbols: (Left column)<br />
ë Power On<br />
Í Audible Alert Mode<br />
Auto On/Off<br />
Ö Alarm<br />
Message Status Symbols: (Top two rows of display)<br />
í Locked Message<br />
Õ Maildrop Indicator (Alert Enabled)<br />
V Maildrop Indicator (Alert Disabled)<br />
ü Message In Memory Indicator<br />
é Memory Full Indicator<br />
Ö Alarmed Message<br />
Function Menu Symbols: (Bottom row of display)<br />
È Choose Alert<br />
Ñ Set Time and Alarm<br />
å Set Auto On/Off<br />
É Set Audible Alert<br />
Ç Set Silent Alert<br />
ó Turn Pager Off<br />
ò Escape (to status screen)<br />
ï Delete Message<br />
ñ Delete All Messages<br />
í Lock Message<br />
ì Unlock Message<br />
Õ Maildrop Indicator (Alert Enabled)<br />
Ì Maildrop Indicator (Alert Disabled)<br />
Ö Set Message Alarm<br />
Add to Notebook<br />
Receiving and Reading Your Messages<br />
When a message is received, your pager alerts and<br />
displays a flashing ü symbol.<br />
➊ Press any button to stop the alert.<br />
➋ Press Ë to display your message.<br />
The pager automatically stores the message and the<br />
time and date it is received.<br />
A flashing arrow Ü at the bottom right corner of the<br />
screen indicates the message you are reading continues<br />
beyond the four lines of the display.<br />
Press Ë to advance to the next screen of the message.<br />
Press to read your message line by line.<br />
Press and hold Ë to rapidly scroll through your message,<br />
screen by screen.<br />
If more than one message exists, press ä or ã to<br />
select the message you want to read. The symbol Ó<br />
indicates the location of the message. Press Ë to<br />
display your message. While reading your messages,<br />
you can press H or I to view the previous or next<br />
message.<br />
A flashing ësymbol indicates you have a message<br />
that has not been read. The pager alerts at predetermined<br />
intervals to remind you of any unread messages.<br />
<strong>ADVISOR</strong> <strong>Gold</strong> and <strong>ADVISOR</strong> <strong>Gold</strong> FLX pagers store<br />
up to 19 personal messages in memory.<br />
3<br />
5<br />
Other Symbols:<br />
å Enter Auto On/Off Menu and Auto On/Off<br />
Enabled<br />
õ Auto On/Off Disabled<br />
ô 24 Hour Time<br />
AM AM Time<br />
PM PM Time<br />
à Disable Alarm<br />
c Enable Alarm<br />
Ç No Message Alert (On Choose Alert Menu)<br />
Õ Chirping Alert (On Choose Alert Menu)<br />
( Full Battery Gauge<br />
, Low Battery Gauge<br />
T Out of Range<br />
Ü Message Continuation<br />
Truncated Message<br />
Alphanumeric Missing Fragment Indicator*<br />
- - - - - Long Numeric Missing Fragment Indicator*<br />
ú Errored Data Indicator<br />
* These symbols apply to <strong>ADVISOR</strong> <strong>Gold</strong> FLX only.<br />
Turning Your Pager On<br />
Press Ë.<br />
Your pager alerts and shows ë in the left column of<br />
the display. The time and date are shown at the bottom<br />
of the display.<br />
Turning Your Pager Off<br />
➊ Press Á to display the function menu.<br />
➋ Press ä to move the cursor to ó.<br />
➌ Press Á twice to turn the pager off.<br />
4<br />
Using the Function Menu<br />
Press Á to display the function menu.<br />
The function menu gives you access to the many features<br />
of your pager through a series of symbols and prompts.<br />
For example, when the function menu screen is first displayed,<br />
the ò symbol flashes, indicating the present<br />
position of the cursor. You can now press ä or ã to<br />
move the cursor within the function menu.<br />
NOTE: To exit from any menu without making changes,<br />
press Ë.<br />
Backlighting<br />
The pager’s backlight illuminates in low-light conditions<br />
when any button is pressed. You can manually<br />
activate or deactivate the backlight at any time by<br />
pressing and holding Á for two seconds. If no other<br />
buttons are pressed, the backlight automatically turns<br />
off when the pager returns to the standby mode.<br />
Locking and Unlocking Messages<br />
Up to 10 messages can be locked in memory, preventing<br />
them from being replaced when memory is full (indicated<br />
by the é symbol).<br />
➊ Press Ë.<br />
➋ Press ä or ã to select the message to lock.<br />
➌ Press Á to display the function menu.<br />
➍ Press ã to move the cursor to lock (í) or unlock<br />
(ì).<br />
➎ Press Á to lock or unlock the message.<br />
➏ The symbol í or ì is displayed, indicating the status<br />
of the message in memory.<br />
6
Setting the Time and Date<br />
➊ Press Á to display the function menu.<br />
➋ Press ä to move the cursor to Ñ.<br />
➌ Press Á to display the set-time screen.<br />
➍ Press ã to move the cursor to the hour digit.<br />
➎ Press or to adjust the hour.<br />
➏ Press ã to move the cursor to the minute digit.<br />
➐ Press or to adjust the minute.<br />
➑ Repeat the process for each set of digits: AM/PM/<br />
24 hr., month/day/year.<br />
➒ Press Á to activate the time and date change.<br />
●Ñ22:23ô05/06/96●<br />
Ã0:00ô--/--/--<br />
SET TIME<br />
Example of Set-Time Screen<br />
If you move the cursor past the last symbol in the row<br />
(far right), it automatically wraps around and displays<br />
at the first symbol in the beginning of the same row (far<br />
left).<br />
NOTE: To exit from any menu without making changes,<br />
press Ë .<br />
Setting the Message Alarm<br />
This feature allows you to set a one-time or a daily<br />
alarm for a particular personal message. You can set<br />
an alarm for up to five personal messages.<br />
To set a one-time message alarm:<br />
➊ Press Ë.<br />
➋ Press ä or ã to select the message you want to<br />
alarm.<br />
➌ Press Á to display the function menu.<br />
➍ Press ã to move the cursor to Ö.<br />
➎ Press Á to display the set-message-alarm screen.<br />
When the screen is first displayed, the cursor is at the<br />
far left position.<br />
This symbol defines the alarm status—either alarm<br />
enabled (c) or alarm disabled (Ã).<br />
➏ From the set-message-alarm screen, follow the<br />
same steps described in Setting the Alarm.<br />
To set a daily message alarm:<br />
Follow the instructions above to set the alarm time,<br />
then follow the instructions in “To set the alarm to alert<br />
daily” under Setting the Alarm.<br />
The b symbol replaces the m symbol when the message<br />
alarm is set.<br />
At the selected time, your pager vibrates or emits a 12second<br />
alert, depending on the current alert mode.<br />
Press J to display the message for which the alarm is<br />
set.<br />
The m symbol replaces the b symbol after the alarm<br />
has sounded unless the alarm is set to alert daily .<br />
NOTE: If the alarm expires without being acknowledged,<br />
the Ö flashes until the message is read.<br />
7<br />
9<br />
Setting the Alarm<br />
The alarm on your pager can be set for a specific time<br />
and date, or it can be used as a daily alarm.<br />
To set the alarm for a specific time and date:<br />
➊ Press Á to display the function menu.<br />
➋ Press ä to move the cursor to Ñ.<br />
➌ Press Á to display the set-time-and-alarm screen.<br />
➍ Press to move the cursor to Ö.<br />
Ñ22:23ô05/06/96<br />
●Ã0:00ô--/--/--●<br />
SET ALARM<br />
Example of Set-Time-and-Alarm Screen<br />
The alarm symbol defines the alarm status—either<br />
alarm enabled (c) or alarm disabled (Ã).<br />
➎ Press ã to move the cursor to Ö.<br />
➏ Press or to enable or disable the alarm.<br />
➐ Press ã to move the cursor to the hour digit.<br />
➑ Repeat the process for each entry (minute, AM/PM,<br />
and date).<br />
➒ Press Á to activate your selection. The Ö symbol<br />
is shown on the display.<br />
At the selected time, your pager emits a 12-second<br />
audible alert even if the pager is in the silent mode.<br />
To set the alarm to alert daily:<br />
Follow the steps previously described, except when<br />
setting the date, press for the date entries until you<br />
see a blank month, day, and year (--/--/--). The alarm is<br />
now set to alert every day at this specified time.<br />
NOTE: If the alarm expires without being acknowledged,<br />
the Ö symbol flashes until any button is<br />
pressed.<br />
NOTE: To exit from any menu without making changes,<br />
press Ë.<br />
8<br />
Setting the Alert Mode<br />
The alert can be set as either audible or silent.<br />
➊ Press Á to display the function menu.<br />
➋ Press ä to move the cursor to É or Œ.<br />
The É symbol is displayed if the pager is in the silent alert<br />
mode (prompting you to enter the audible mode, if<br />
desired). The Œsymbol is displayed if the pager is in the<br />
audible alert mode (prompting you to enter the silent<br />
mode, if desired).<br />
➌ Press Á to select the desired alert mode.<br />
If the selected mode is audible (É), your pager emits a<br />
short chirp. If the selected mode is silent (Œ) and your<br />
pager is equipped with a vibrator, your pager vibrates.<br />
Setting the Alert Pattern<br />
NOTE: The pager must be in the audible alert mode to<br />
select the alert pattern.<br />
Your pager has a standard alert (1), seven different pleasing<br />
alerts (2 through 8), and a chirping alert (Õ), allowing<br />
you to select and change the alert. You can also select no<br />
alert (Œ).<br />
To change your alert:<br />
➊ Press Á to display the function menu.<br />
➋ Press ä to move the cursor to È, then press Á.<br />
➌ Press ä or ã to move the cursor to the desired alert.<br />
The pager gives a sample of each alert when scrolling<br />
through the selections.<br />
➍ Press Á to activate the alert.<br />
10
1 2 3 4 5 6 7 8 j r<br />
PLEASING ALERT<br />
Example of the Alert Pattern Screen<br />
Turning the Maildrop Alert On and Off<br />
You can set your pager to alert when a maildrop (also<br />
known as information service) message is received.<br />
➊ Press Ë.<br />
➋ Press to move the cursor to Õ.<br />
➌ Press Á to display the function menu.<br />
➍ Press ã to move the cursor to the alert on (Õ) or<br />
alert off (Ì) symbol.<br />
The symbol Õ is displayed if the maildrop alert is on<br />
(prompting you to turn it off, if desired).<br />
The symbol Ì is displayed if the maildrop alert is off<br />
(prompting you to turn it on, if desired).<br />
➎ Press Á to select the desired maildrop alert mode.<br />
Deleting Messages from Memory<br />
You can delete an unlocked and un-alarmed message<br />
from memory while you are viewing the message or<br />
through the function menu.<br />
To delete messages using the function menu:<br />
➊ Press ä or ã to select the message you want to<br />
delete from memory.<br />
➋ Press Á to display the function menu.<br />
➌ Press ã to move the cursor to ï.<br />
➍ Press Á to receive confirmation of the request.<br />
➎ Press Á to delete the message.<br />
Deleting Messages from Your Notebooks<br />
11<br />
➊ Press ã to move the cursor to .<br />
➋ Press Ë to display a list of notebook messages.<br />
➌ Press F or G to scroll through the list until K is displayed<br />
at the notebook message you want to delete.<br />
➍ Press Á to display the function menu.<br />
➎ Press ã to move the cursor to ï.<br />
➏ Press Á to confirm the delete request.<br />
➐ Press Á to delete the message. Repeat these<br />
steps to delete each message.<br />
Setting Auto On/Off<br />
To set your pager’s auto on/off feature, proceed as follows:<br />
➊ Press Á to display the function menu.<br />
➋ Press ä to move the cursor to å.<br />
➌ Press Á to display the auto on/off screen.<br />
When the screen is first displayed, the cursor is at the<br />
farthest left position. The enabled (å) or disabled (õ)<br />
symbol indicates the current status.<br />
ON OFF<br />
õ 0:00ô 0:00ô<br />
Example of Auto On/Off Screen<br />
➍ Press or to select å or õ.<br />
➎ Press ã to move the cursor to the hour digit. The<br />
Auto On time is displayed on the left and the Auto<br />
Off time is displayed on the right.<br />
➏ Press or to adjust the hour.<br />
13<br />
To delete all unlocked, un-alarmed and read<br />
messages from memory:<br />
➊ Press Á to display the function menu.<br />
➋ Press ã to move the cursor to ñ.<br />
➌ Press Á twice.<br />
All unlocked, un-alarmed and read messages are now<br />
deleted.<br />
NOTE: Personal and maildrop notebooks are not<br />
deleted with this feature.<br />
Moving Messages to Your Notebooks<br />
Your pager has two notebook areas: a personal notebook<br />
for storing personal messages, and a maildrop<br />
notebook for storing information service messages.<br />
To store a message in your personal notebook:<br />
➊ Press Ë .<br />
➋ Press ä or ã to move the cursor to select the message<br />
you desire to move into your personal notebook.<br />
➌ Press Á to display the function menu.<br />
➍ Press ã to move the cursor to .<br />
➎ Press Á to move the message into your personal<br />
notebook.<br />
The symbol is shown in the top right-hand corner of<br />
the display.<br />
To store a message in the maildrop (information<br />
service) notebook:<br />
Follow the same steps as described for storing personal<br />
notebook messages.<br />
The symbol is shown in the second row, right-hand<br />
corner of the display.<br />
12<br />
➐ Repeat the process for each set of digits for both the<br />
on time and the off time (hour, minute, AM/PM if<br />
your pager is set to display time in the 12 hour<br />
mode).<br />
➑ Press Á to activate auto on/off.<br />
The å symbol is displayed if the auto on/off function is<br />
enabled. If the on time is equal to the off time, the<br />
pager does not enable the auto on/off function.<br />
Other Features<br />
Battery Gauge: The battery gauge indicator is located<br />
on the status screen and keeps you informed of the<br />
battery energy level. The five indicators range from full<br />
to low: ( (full), ) (3/4), * (1/2), + (1/4),<br />
and , (low).<br />
Key Click: When this feature is enabled, and the<br />
pager is in the audible mode, a “click” is emitted whenever<br />
a button is pressed. The click is not heard when<br />
the pager is in the silent mode.<br />
Duplicate Message: If the same message is received<br />
more than once, DUPLICATE MESSAGE is displayed<br />
at the beginning of the new message. The new message<br />
contains the latest time and date stamp.<br />
Out of Range: With this option enabled, T is displayed<br />
whenever you are out of range of the paging transmitter.<br />
Your pager can also alert you of this if this feature is<br />
enabled. The symbol T is no longer displayed when<br />
you return to your transmitting area.<br />
Errored Data Indicator: The ú symbol displays when<br />
potentially corrupt data is received. The indicator alternates<br />
with the corrupted character.<br />
14
Alphanumeric and Long Numeric Missing Fragment<br />
Indicators: If part of the message has not been<br />
received, or - - - - - is displayed. Note: This applies<br />
to <strong>ADVISOR</strong> <strong>Gold</strong> FLX pagers only.<br />
Maildrop History: When this option is enabled, the<br />
pager stores up to four history files per maildrop (information<br />
services) slot selected. When a new maildrop<br />
message is received on a specific slot, the existing<br />
message is “pushed” into the history area and the new<br />
message is stored in the maildrop slot. When a fifth<br />
history file is received, the oldest history file is deleted.<br />
Battery Information<br />
Your pager is designed to operate with a single AA-size<br />
alkaline battery (carbon zinc batteries are not recommended).<br />
See the diagram on the following page for the<br />
battery door location.<br />
To install or replace the battery, place the pager face<br />
down and proceed as follows:<br />
➊ Unlock the battery door by sliding the door latch<br />
away from the battery door.<br />
➋ Slide the battery door in the direction of the arrow<br />
(toward the outer edge).<br />
➌ Lift the battery door away from the housing to<br />
remove it. Lift the battery out of the battery compartment,<br />
taking note of the positive (+) and negative (-)<br />
markings on the battery and the pager housing.<br />
Repair and Maintenance<br />
15<br />
Your pager, properly handled, is capable of many<br />
years of trouble-free service.<br />
However, if your pager ever requires service,<br />
Motorola’s Service Organization, staffed with specially<br />
trained technicians, offers conveniently located repair<br />
and maintenance facilities throughout the world.<br />
Please contact your paging service representative or a<br />
Motorola sales office for more information.<br />
Patent Information<br />
This product is manufactured under one or more Motorola<br />
U.S. Patents. A partial listing of these patents is provided<br />
on the inside surface of the battery door. Patent numbers<br />
listed under the heading VH and QW apply to specific<br />
product models, as indicated below. Patent numbers<br />
listed under the heading ALL apply to all models of this<br />
product. Other patents covering this product are pending.<br />
The model number is located on the back of the product,<br />
as indicated by the example model number below:<br />
A03xxB5962AA<br />
If positions xx are occupied by VH, the patent numbers<br />
listed under VH and ALL apply to this model of<br />
the product.<br />
If positions xx are occupied by QW, the patent numbers<br />
listed under QW and ALL apply to this model of<br />
the product.<br />
17<br />
To install a new battery, reverse this procedure, taking<br />
note of the positive (+) and negative (-) markings.<br />
CAUTION: Do not insert the battery backwards or the<br />
messages stored or locked in memory will be erased.<br />
Care of Your Pager<br />
To maintain the fine optical quality of the display in the<br />
pager, do not subject it to extreme temperatures and<br />
moisture.<br />
Cleaning Your Pager<br />
To clean smudges and grime from the exterior of the<br />
housing, use a soft, nonabrasive cloth moistened in a mild<br />
soap and water solution. Rinse the surface using a second<br />
cloth moistened in clean water. Do not immerse the<br />
pager in water. Do not use any other cleaning solutions.<br />
16<br />
Ì<br />
➊<br />
<strong>ADVISOR</strong> <strong>Gold</strong> FLX Pager Battery<br />
Replacement (rear view)<br />
t, Motorola, <strong>ADVISOR</strong>, FLEX, and are trademarks<br />
or registered trademarks of Motorola, Inc.<br />
© 1996 by Motorola, Inc.<br />
All Rights Reserved.<br />
Paging Products Group<br />
1500 Gateway Blvd.,<br />
Boynton Beach, FL 33426-8292<br />
Printed in U.S.A. 8/96<br />
@6881027B05@<br />
6881027B05-B<br />
➋<br />
➌