Drawing & Painting blog
HOW TO DRAW PEOPLE, STEP BY STEP
Drawing a portrait from a photo, in ten steps
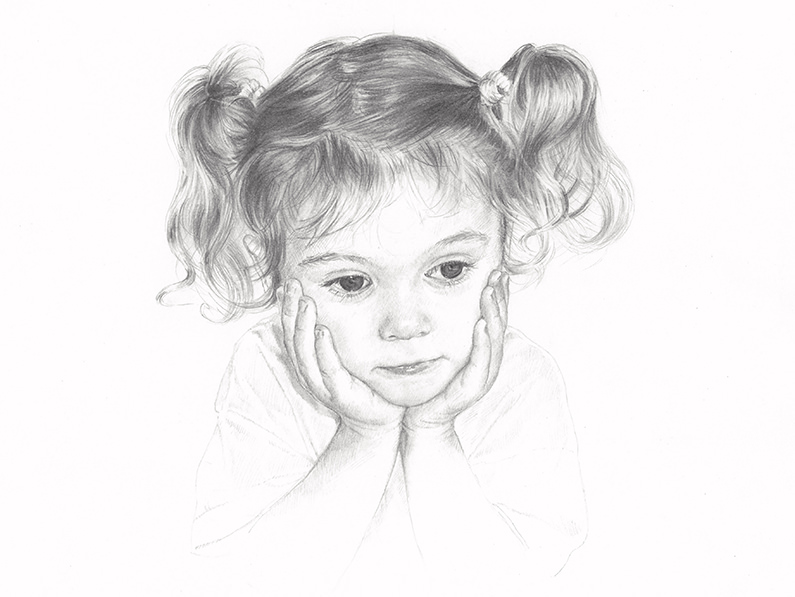
I’m often asked how I approach the process of creating a hand drawn portrait. When faced with an intimidatingly blank sheet of paper, where do you begin? Some artists use a grid system or a ‘lightbox’ that makes their reference photograph visible under their drawing paper, whilst others may use nothing at all and will simply pitch in and measure by eye.
Everyone has a different process and style and it’s important to say that there are no right or wrong way to approach a portrait, but this is the way I do it. I’m describing a method for copying from a reference photo because this is how I create my portraits, but most of the advice will still be relevant if you want to draw a sitter who is in front of you. I’m a firm believer that absolutely anyone can learn to draw if they first learn now to LOOK properly, so let’s get started and I will take you step by step through my process…
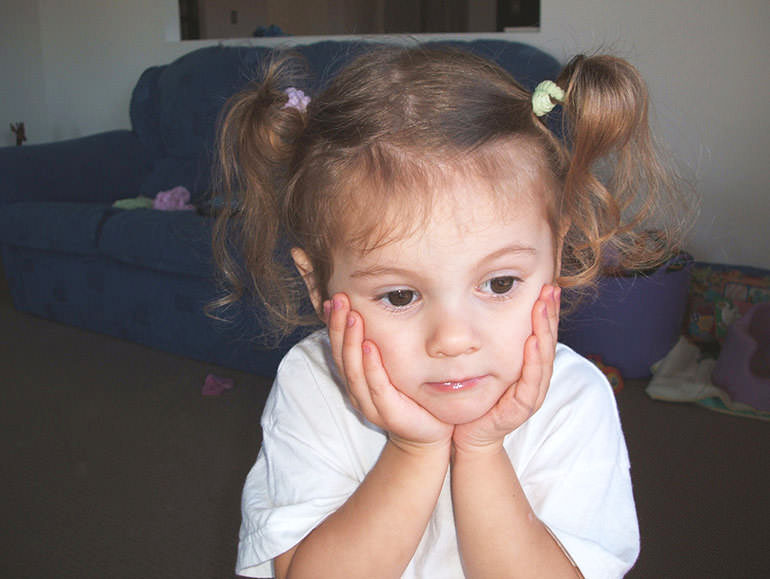
1. I begin by printing out my reference photo at the same size I want to draw my portrait
I personally find it easier to achieve a likeness if I print my photo reference out at exactly the same scale that I want to draw the portrait. I think it’s just much easier to copy precisely when you aren’t either shrinking or enlarging from your reference. It’s also important not to try to work from a photo that’s too small to see all the detail within the face. If you are drawing from a photo, make sure it’s a sufficiently large image.
I always like to work from digital photos, and if required to work instead from a printed picture I’ll scan it in so I can print it out again at a larger size. First I print the image out onto cheap inkjet paper using the grayscale setting, until I’ve got the size to exactly where I want it (adjusting the percentage in the ‘scale’ settings of your printer is usually the easiest way to do this) When I’m happy with the size I’ll print it out in colour on photo quality paper using the ‘fine’ print setting. I will print out two copies, because I’m going to draw grid lines on one of them.
2. I draw a pair of axis lines on one of those printed photos
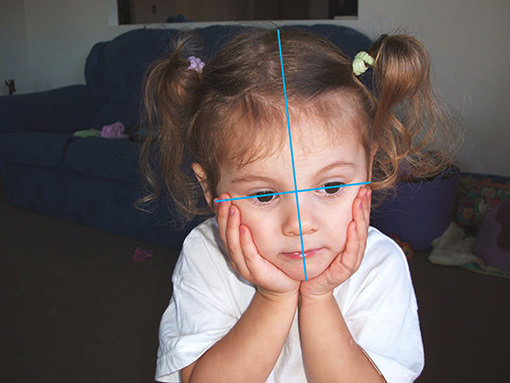
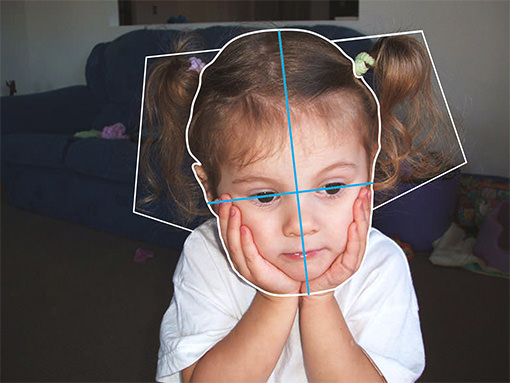
Taking a waterproof marker pen such as a ‘Sharpie’ I draw a line on one of my printed photos along the vertical axis of the head, running from the centre of the chin up between the eyes through to the top of the head (here I’ve marked it in blue, so you can see it clearly). Next, I draw a horizontal line through the centre of the eyes. With most people, you’ll find that these two lines will be at more or less 90 degrees from each other.
Next I take a sheet of tracing paper and place it over my photo. I trace over the axis lines before turning over my paper and very lightly drawing over them again. Then I turn the tracing paper back, place it on my drawing paper and gently rub over the lines to transfer them. I use an HB grade pencil for this because any softer and the lines might not erase fully later, whilst a harder pencil might indent the paper.
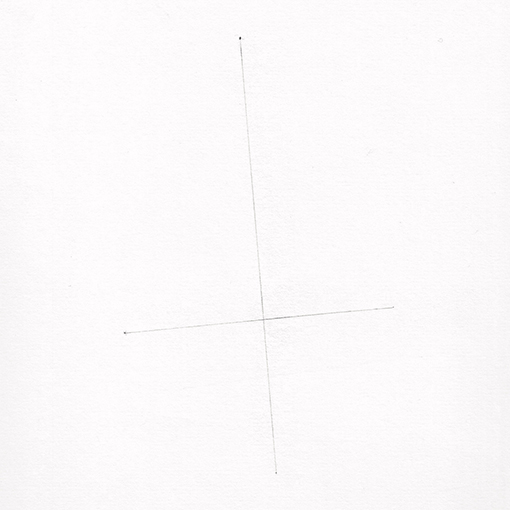
So now I have a cross shape on my paper which gives me both the angle of the head I’m about to draw, and a sort of grid to measure the shape of the head and all the features of the face against. Instead of tracing the axes you could simply copy them onto your drawing paper by eye, but tracing is an immensely useful shortcut when I’m drawing professionally and have to work at a certain speed. Now I’m ready to start drawing.
3. Using my axes, I visualize the head in four quarters in order to perceive the overall shape
Looking at my reference photo with the axes drawn on it, I start to consider the shape of the head in relation to those vertical and horizontal lines. I imagine the head divided into four quarters and I visually compare the size and shape of each quarter and try to picture each one individually. I also look at the ‘negative’ space created by the shape, as if the white outline was a cut-out.
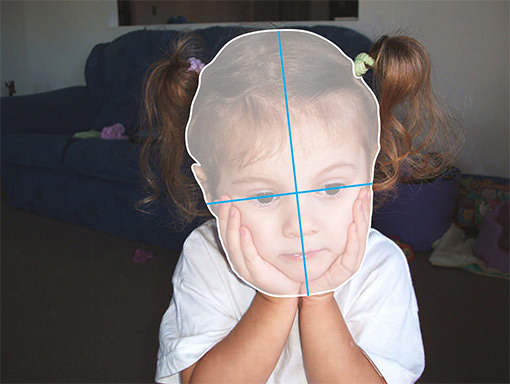
The reference photograph I’m working from is complicated by the fact that the girl’s hands are cupping her chin and hiding the edges of it, so I need to visualise both the shape created by of the edges of her hands, and the shape made by those hands cupping around her chin too. I compare these shapes to each other.
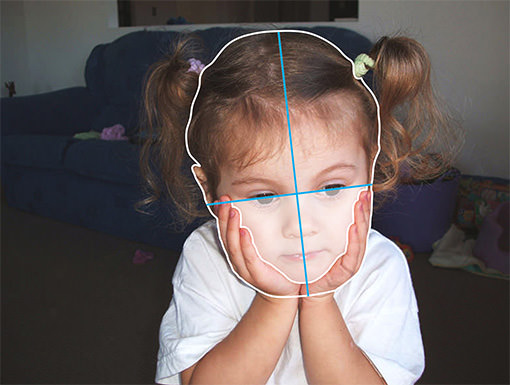
Now I copy the shapes of the four quarters of the head and the edges of the hands to my paper. I draw them very lightly with soft sketchy lines so I can keep adjusting them until I’m happy that my overall head shape is fairly accurate. I may alter them some more when I start to add in more detail later, but for now I have a good starting point to work from.
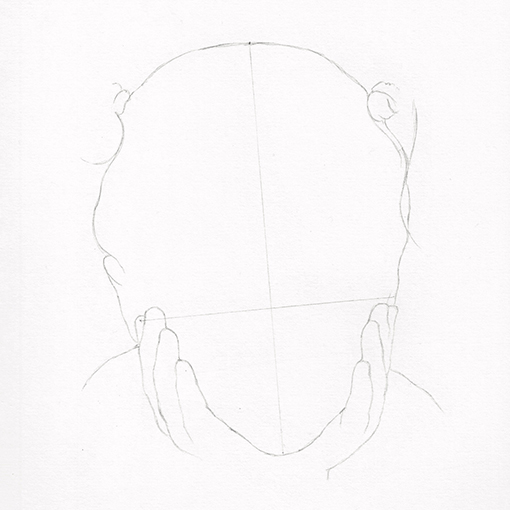
This grid method is so useful for helping you to find the true position of all of the features. For example, the position of the eyes is something that’s very easy to get wrong, and beginners tend to place them much too high up within the head. Because we invest such ’emotional’ importance in the face, we tend to make facial features overly large in relation to the rest of the head and don’t make either the forehead or the back of the head as big as they really are. Using a grid to carefully assess the height of the line of the eyes corrects this error.
4. I measure all the features of the face against my axis lines and lightly sketch them in.
Next, I start making some very light marks to define the positions of the eyes, eyebrows, nose and mouth. With every line I’m measuring carefully by eye along the axes I drew on my reference photo, and asking myself constant questions. In relation to the central vertical axis, how far along the horizontal axis line does each eye start and end? Which vertical distance is greater, the centre of the eyes to the bottom of the nose or the bottom of the nose to the bottom of the chin? Are the corners of the mouth horizontally aligned, or is one corner higher than the other, and if so then how much higher?
It’s important to measure everything before you make a mark. People who don’t draw tend to assume that artists are simply people with very good ‘hand to eye coordination’ but really they are looking and measuring by eye all the time as they work, and this is something that anyone can learn to do.
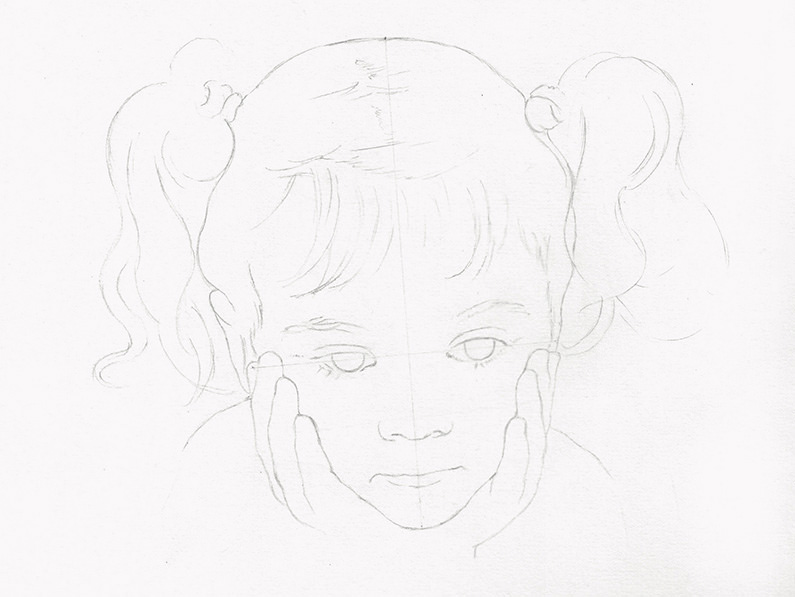
Before I start drawing the girl’s pigtails I draw some lines around them on my reference photo with a Sharpie so I can clearly visualise the shape of the spaces that they occupy and gauge their size and position. I compare the widths of the pigtails with the width of each half of the face.
So far I have kept all my lines very light so they won’t be very visible in the finished drawing. Before working over them in more detail I will drag my putty eraser over them until they are barely visible. I don’t want them to form part of the finished drawing because aside from a few strong shadow lines, faces are not really composed of lines but are made up of shapes defined by different tones and shades. What I have created so far with my sketchy lines is simply a sort of ‘map’ of the face, so I can orient myself and feel confident in my overall dimensions as I work around the image comparing and shading in these tonal areas.
From this point on, I will try to curb the tendency to draw in lines too much and not to ‘impose’ them when they aren’t really there. For example, people frequently assume that the lips will finish in a hard, sharp edge and will draw them bordered with a line, top and bottom. Look very closely at the lips in the reference photo however (or at your own lips, in the mirror) and you’ll see that this isn’t really the case.
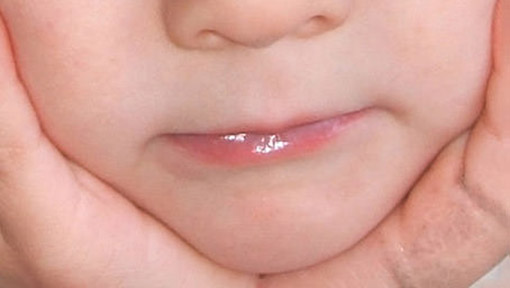
Notice how lips are actually bordered by an area of intermediate tissue, that is thicker and paler than the lip tissue, but thinner and redder than regular skin. As a result the edges of the lips do not stop suddenly but ‘feather out’ gradually as the top lip meets the skin below the nose and the bottom lip meets the skin of the chin. The only real ‘line’ to be see in a small shadow line underneath the bottom lip. It’s this kind of really close examination – never making assumptions about what you think a feature looks like – that will help you draw more accurately.
I’m next going to show you my pencils and erasers, because once I reach this stage of building up tones I tend to draw almost as much with my erasers as with my pencils, layering my pencil shading and then softening and cutting in highlights with my erasers.
I use three types of erasers. The first is a brilliant Koh-i-Noor eraser pencil which allows me to erase very small areas. I use this for rubbing out mistakes but also for hatching back over my shading in order to soften it.
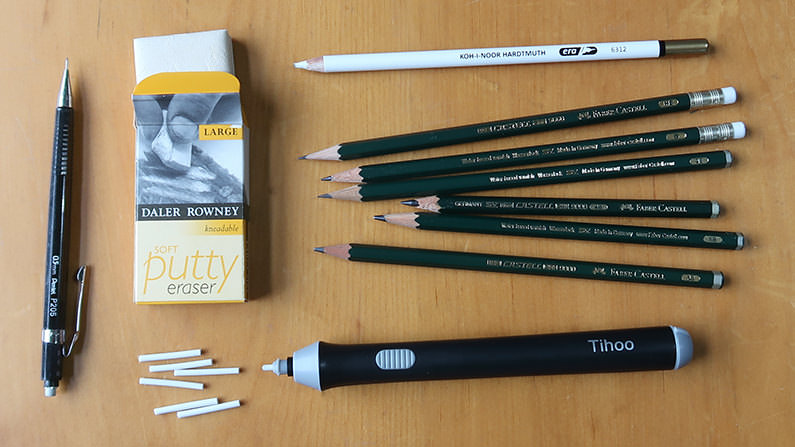
Secondly, I use a soft putty eraser which is mouldable and is good for lightening my early sketch layers, or for cleaning marks off the drawing paper. Putty erasers don’t shed little bits of rubber and you just trim them with scissors when they get too covered in graphite.
The last type is my battery powered electric eraser which is really invaluable for drawing highlights, especially in hair. It comes with two different widths of eraser and I most often use the tiny 2.5mm attachment (under 1/8 inch) for cutting in fine highlights.
I draw with Faber-Castell’s 9000 pencils, in several grades between HB (your standard writing pencil) and 8B, which is very dark and soft. Most of the shading on the little girl’s pale skin will be done with the light HB or B pencils. For the areas of mid-tones I’ll use a 2B and 4B, and for the darkest shadows I’ll use a 6B and 8B. I also use my Pentel technical pencil with very fine 0.5mm leads to draw the smallest details within the eyes as well as the eyelashes, eyebrow hairs and those whispy hairs that often frame the face. You can refill one of these pencils with leads in a variety of grades and I like to use B grade leads.
5. I study and contrast different areas of tone within my reference photo, and start to shade in the very darkest and lightest areas on my drawing
Once I’ve finished ‘mapping in’ the features of the face, I’ll completely erase my axis lines using my battery eraser or my eraser pencil. I then set aside the reference photo with the lines drawn on it and start examining the other copy I printed. Firstly I’ll consider, where are the very darkest tones I can see in the image?
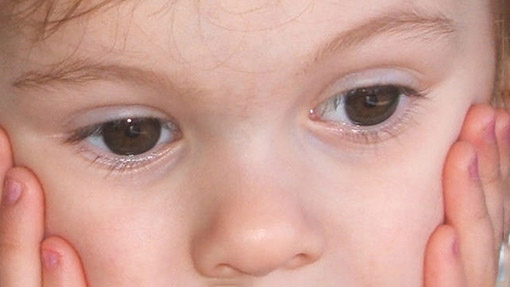
Often you’ll find the darkest spots within the pupils of the eye. However you might also find that the the darkest tones are within the nostrils, in the corners of the mouth, in the shadows of the ears or the places where the fingers are pressed together. I try not to make any assumptions but to search out these very darkest areas and then shade them onto my drawing using the 6B or 8B pencil. I’m still measuring constantly by eye before making any mark, comparing the size and shape of each area of tone with those around it.
Next I identify the brightest areas in the image. These will usually be tiny highlights reflected in the iris or pupil of the eyes or in the tear ducts, but they can appear on any moist area such as the lower lids or on the lips . These tiny highlights are fiddly to draw but crucial to capturing the expression and life in someone’s eyes, so I will draw the outline them with my very automatic pencil and leave them as completely blank paper. If I need to I’ll brighten them up at the end using my battery eraser.
Contrary to what you might expect, the whites of someone’s eyes don’t usually appear as entirely bright and white. There will probably be highlights within them but on close examination you’ll also see all sorts of colours and tones created by shadows or by the blood vessels within them.
6. I build up all the tones in layers of hatches
Now I start to move around the face, building up all the other areas of tone. I don’t start with one feature and move on to another, in fact I try to view the face as an abstract collection of shapes and don’t ‘name’ the features in my head as I look at them. This helps me to avoid imposing any preconceptions.
Instead I look at areas of light and dark all over the face and compare those tones with the extremities of light and dark that I’ve already established. For example, how dark is each shadow in relation to the blackness within the pupils? Initially I try to define areas of tones fairly broadly, and not get too bogged down in detail. Squinting at my reference photo really helps me to see the overall shapes and tones of different areas of the face. I block these in lightly, building up a bit more hatching in the darkest areas.
In fact, I don’t aim to shade the skin tones entirely as I see them. My goal is to shade as little as possible on the face because I want to give the impression of a ‘light touch’ and to convey the skin’s natural luminosity and reflectivity. Too much shading would make it look too grey, and so with pale-toned skin I leave as much blank white paper as possible and not just where I see the brightest highlights. I build up shading slowly and gradually so that I don’t overdo it.
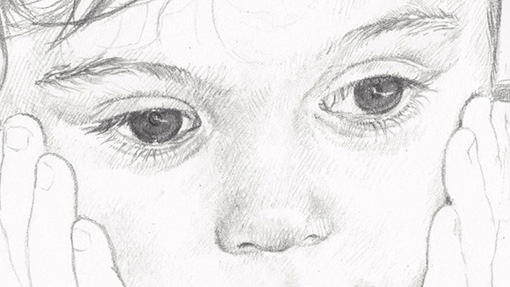
I shade by hatching very lightly in one direction, and sometimes cross hatching over this again at in another direction if I want to darken my tones further. Sometimes I’ll cross hatch over my lines with my eraser pencil if I want to soften and smudge them a bit. When shading skin, I never smooth the graphite with my fingers. Not only does this risk introducing any dirt or the natural oils in your skin to the paper which can then mix with graphite dust and create oily marks, but it also creates a really dull tone.
Instead, I want the textured grain of the paper and the gaps between my hatched lines to cause tiny specs of white paper to be preserved amidst the shading. This gives the skin the impression of glow and luminosity even in areas of dark shadow – a bit like a watercolour painting where the white paper shines through the transparent paint.
This hatching technique works perfectly for any skin tone including darker skin shades, which are actually the brightest and most reflective of all skin types. For darker skin I convey the skin’s colour by hatching with my shadows more heavily and using darker, softer pencils, but still allowing those specks of bright paper to peek through my strokes. As with paler skin I try not to shade too heavily, aiming to portray the shade of the skin accurately in the mid-tones but leaving the brightest areas very lightly shaded to convey the skin’s natural shine.
7. I divert from the face to complete the hair
Once I’ve made a ‘first pass’ at laying in some tones within the face and before I go any further, I will divert to fully drawing the hair. There are two main reasons for this. Firstly, the colour of the hair will affect how I perceive the tones of the skin, because it will usually be darker. Once I start shading in the hair tone I will often start to feel that my skin tones are too subtle and pale in contrast and I will usually end up darkening the skin by adding more shading.
Secondly, it has really surprised me to discover how critical the correct hair tone and hairstyle can be to achieving a good likeness! Sometimes I feel I haven’t captured the person until I draw in their hair, and then suddenly the likeness will start to come together. Therefore I never leave the hair until the very end.
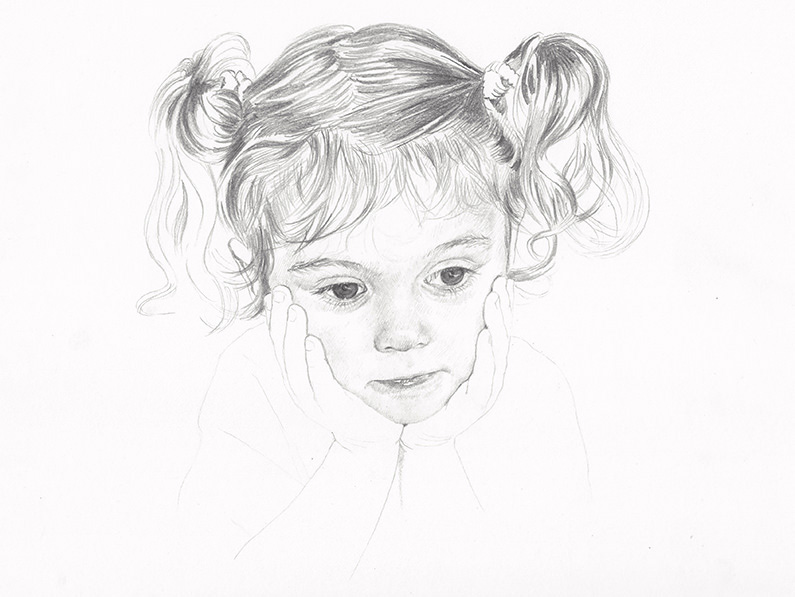
I have developed a whole technique for drawing hair which you can read about in this tutorial on how to draw hair step by step. It involves working in quite a few layers: first shading, then smoothing my pencil marks down, adding more shading, and smoothing again. Hair and clothes are the only places that I will rub the pencil onto the paper a little to create the impression of sleekness, but I always use a bit of tissue for this and never my fingers.
As with the face I start by sketching in some basic lines in order to orient myself: I look for the large locks of hair and identify which direction they are flowing. I then start hatching in blocks of tone, fairly broadly and without much detail and always shading in the same direction as the hairs. I’ll smooth this first layer down, and then add darker shading over the top before smoothing down some more. I’m aiming to represent the hairs in a sort of ‘abbreviated’ way, with smooth base tones and visible pencil strokes within them which can stand for the hairs themselves.
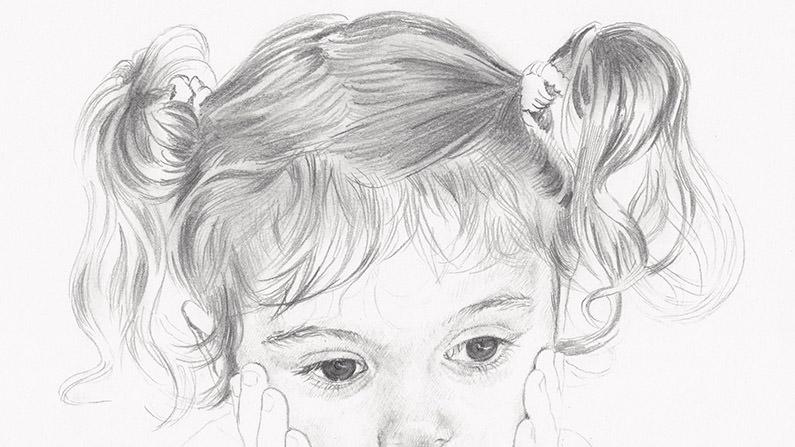
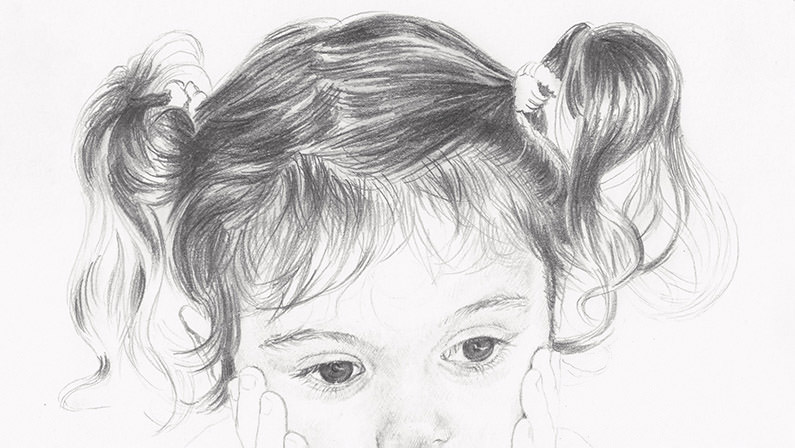
Lastly I add highlights with the electric eraser, and rub them gently with a tissue to blend them in, maybe breaking them up a bit with some more pencil lines on top. Finally I’ll squint at my reference and drag a putty eraser back over the broad areas of highlighted hair to create more shine effect.
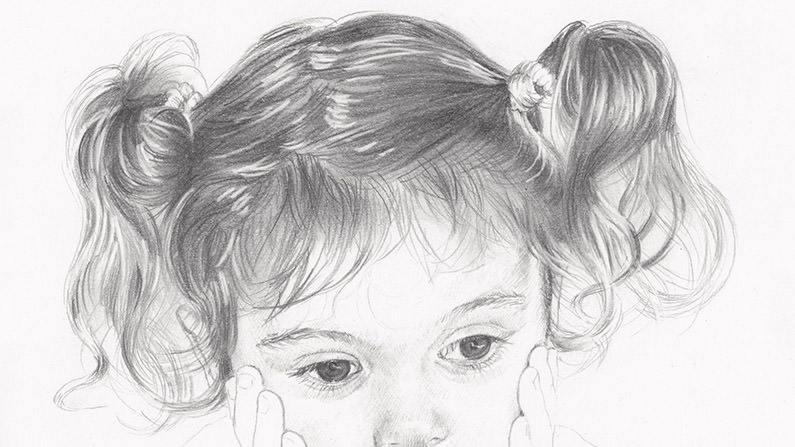
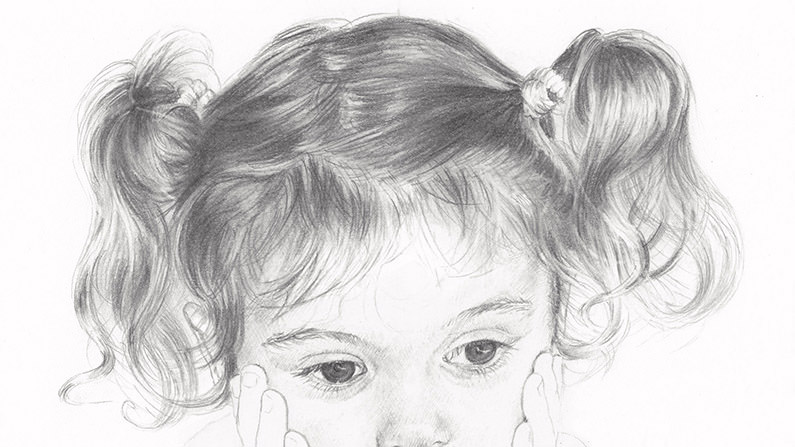
8. Returning to the face, I refine the shading some more
Once I’m happy that the hair is finished I’ll return to the face, adding more shading if the skin now seems too pale (I want to keep the shading light on the skin, but don’t want her to look too ghostly). I also want to work in a bit more detail and tonal variety. If I want to soften my hatched lines a little I will hatch over them again with my eraser pencil, to lighten them and very slightly blur the graphite. The more I layer and re-layer the hatching the more soft and subtle it starts to look.
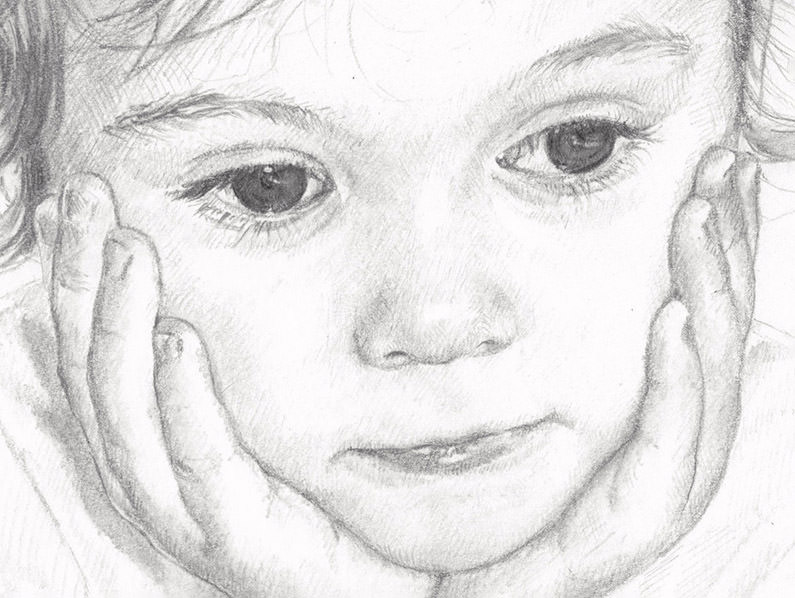
9. If the likeness isn’t quite there, I look at it upside down!
At this point I’ll usually take a break. It’s helpful to leave the drawing for a little while, breaking that strong concentration and resting before returning to look. Sometimes when I look at the drawing again I’ll feel that I’ve captured the likeness, and other times I’ll feel that something is not quite right. This is really challenging because often it’s hard to identify what it is that is slightly inaccurate and is throwing the likeness off. If you do need to troubleshoot, my best advice is to turn both the reference drawing and your own sketch upside down and compare the two.
What this does is to give you a new viewpoint, and make the image you are copying look unrecognisable because it will no longer resemble a face. Your brain will only be able to register an abstract collection of tones, and this will make it much easier to see how what you’ve drawn differs from the original photograph. Any area that’s too dark, too light, or in the wrong position will be much easier to spot and amend.
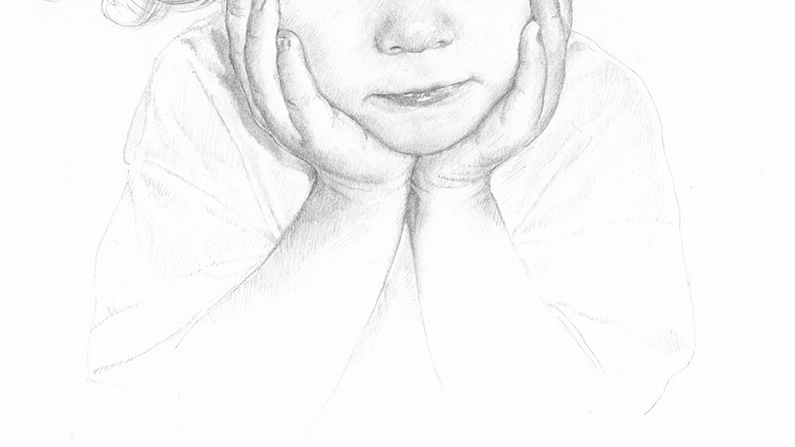
10. I shade the hands, and lightly suggest suggest the forms of the shoulders
Lastly I draw in something to indicate the hands, arms and clothing. I generally like to keep these areas pretty sketchy and minimal, keeping the detail concentrated mainly on the head so that the viewer’s attention is drawn to the subjects’ face.
In this drawing I’ve sketched the girl’s hands quite carefully because they are right under her chin, but I fade out as I go further down her arms. I use just a few strokes to suggest the shapes of the arms and the way they are resting on a table and supporting her. With the girl’s clothes I just draw enough to give a brief indication of her t-shirt and to suggest the forms of her shoulders beneath, but without distracting the eye too much information.
Whatever colour of clothing my subject is wearing I usually draw it much lighter in tone than it actually appears, so that it doesn’t draw the focus away from the face. As I sketch further down her body my hatching turns to faint lines, which then fade out to blank paper. Finally I’ll take a putty eraser and gently clean any unintended pencil marks or smudges from the drawing.

CATEGORIES
DRAWING PEOPLE
DRAWING ANIMALS
DRAWING MATERIALS
OIL PAINTING
WATERCOLOUR
PAINTING MATERIALS
FRAMING

