
How to Draw Faces
Welcome to how to draw faces, here I have simplified down the steps and given brief explanations. You can grab the worksheet below to help you practice~
The examples below will be of a portrait that is stylized but the steps will work for more realistic faces as well. I will be erasing away guidelines through each step to help make the diagrams as clear as possible; take note of which lines disappear as the features of the face get added.

Step 1. Head shape
Sphere: Start by drawing a sphere which is the large form of the head. This step is crucial in being able to draw heads from imagination because it allows us to construct the rest of the portrait.
Centerline & Side: Define the side plane and centerline of the head. This describes the orientation of the head, notice how we can already see which way the head is facing with this step. The center-line will help us place the features on the face, make sure to get it in the right place.
Jaw & Cheeks: Define the chin using the center-line of the previous step and then draw in the jaw and cheeks from there. There is a clear distinction between the side plane and front plane of the head in this step, this makes it easier to understand how the head sits in 3D space.
Eye Sockets: Add two horizontal lines that create a region for the eyes to fit within. This area is sunken into the sphere we drew earlier.
Neck: Add a cylinder for the neck.
To practice drawing the head, grab the worksheet below and you can also check out a more specific step by step tutorial here
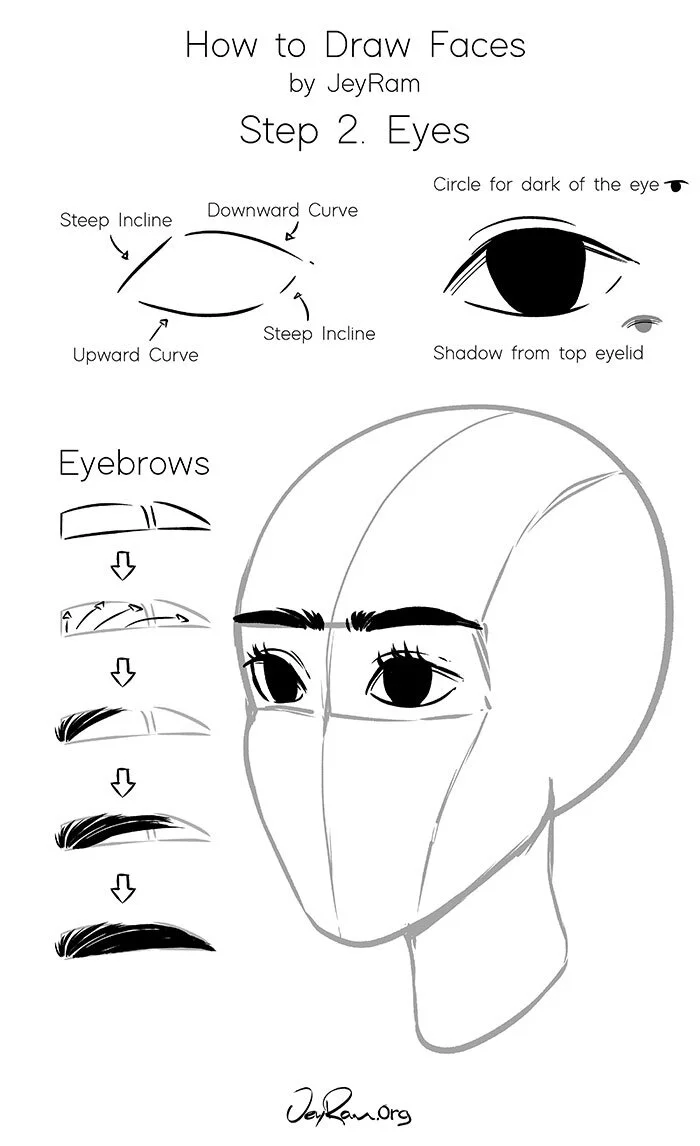
Step 2. Eyes
Upper Lid: Draw curved lines with a steep angle on the end towards the nose to define the upper lid of the eye. You can really play around with the shapes of the eyes, but the inner corners tend to have a sharp angle to them.
Lower Lid: Add an opposing curved line for the bottom lid, this gives us the overall shape of the eye. Take time to erase and change the design as you see fit, you can create a lot of personality and character just in the design of the eye.
Semi Circle: Add the dark region of the eye, for this, I have added one large semi-circle for the entire center of the eye. For a more detailed eye you can check out the tutorials that go over highlights and the dark of the pupil.
Eyebrows: Draw in the eyebrows by filling in guidelines for the overall shape and then drawing in the hairs. I have a step by step for this step that you can check out here.
Eyelashes: Draw in the eyelashes using curved lines that are similar in nature to the eyebrows. The key to good eyelashes is getting used to the swooping motion and making sure they are thinner towards the ends and thicker towards the base.
For more eye drawing practice you can use the worksheets below and also check out the step by step tutorial here
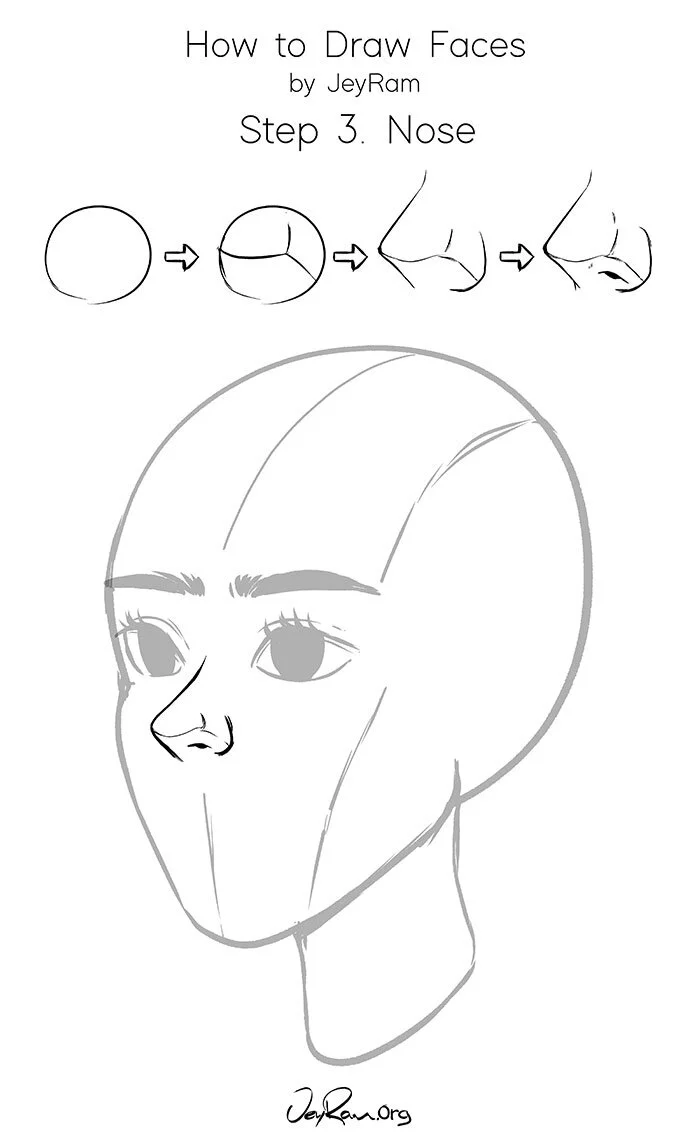
Step 3. Nose
Sphere: As you can tell, I am a fan of using spheres to start building. Draw a sphere that sits on the centerline, the placement will depend on if the head is facing straight forward or to the side. The more the head turns to the side, the more this sphere will sit at the edge of the line, if the head is facing straight forward the center-line will dissect the sphere through the center.
Bottom Plane: Define the underside of the nose by drawing a curved rectangle.
Nostrils: Add small cave-like shapes to the bottom plane for the nostrils. I try to avoid making the nostrils too round and try to use small straight lines.
Bridge: Draw the bridge of the nose by extending the edge(s) of the nose up towards the eyebrows. The shape and size of the bridge depend largely on the orientation of the face and what type of character design you are going for.
I have a step by step tutorial for the nose that you can check out here and also worksheets you can grab below :D
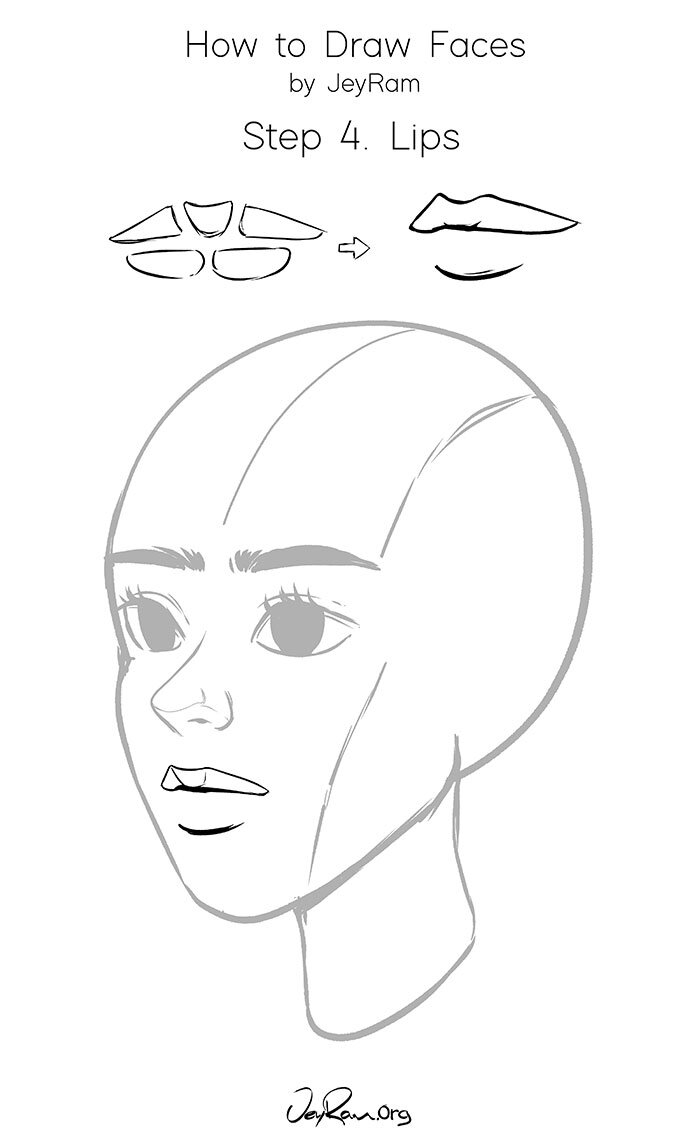
Step 4. Lips
The lips are made up of 5 cushions, for the top lip, we have a middle section and two wings that slope downwards. The points where the middle section meets these side sections is where you will commonly find sharper points on the lips. The bottom lip is made up of two round cushions that meet in the middle, for some lips this middle line will appear more prominently.
You will notice that in the example I have left the bottom lip open without drawing in the full lines, simplifying down the details can make it feel more natural than drawing in all the lines. This is a stylistic choice if you shade in your drawings or are painting you would put in the full bottom lip.
I also have a more in-depth tutorial on drawing the lips that you can check out - Here - and one on the mouth when its open - Here -

Step 5. Ear
Large Form: Draw in the outer form of the ear. Double-check the proportions and make any adjustments if you want a different design.
Inner Details: Fill in the inner curves of the ear and darken the inner ear to give it more depth.
You can check out how to draw the detailed ear here or the simplified version (like the one in the example) from the side here, and also from the front here.
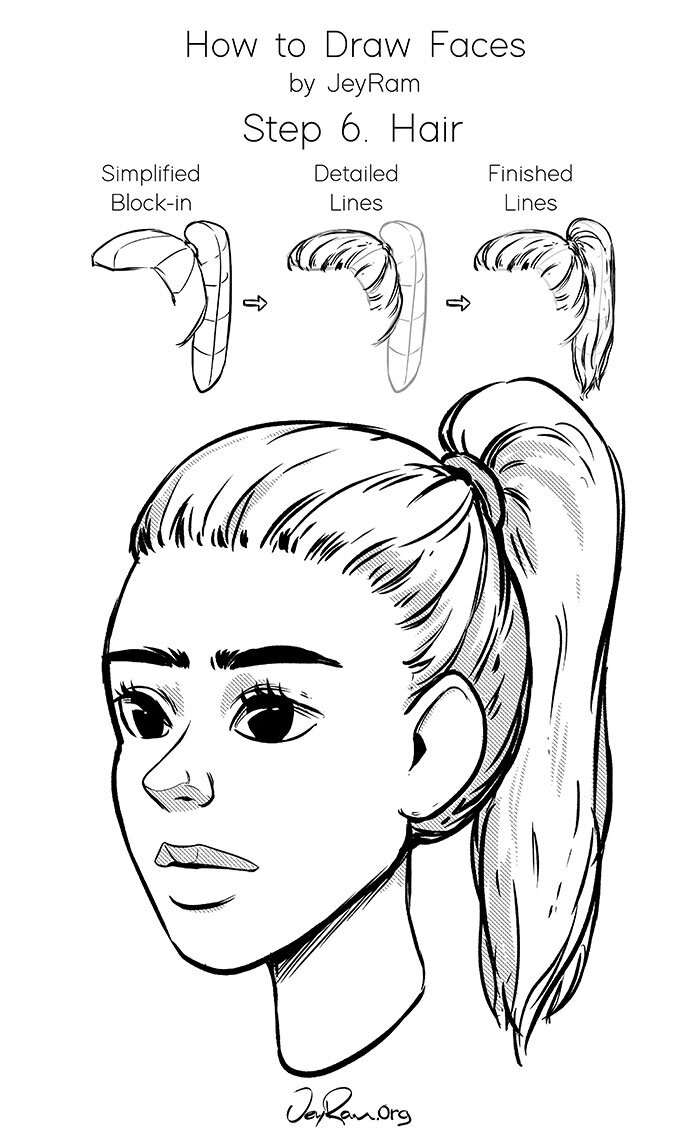
Step 6. Hair
Large Forms: Draw in the large forms of the hairstyle you have chosen. I have blocked in two large chunks that have dimension so I can add in the details using these guidelines. The challenge when drawing hair is giving it volume while keeping it light, using large blocks gives us the guidelines to draw in elegant linework without losing the overall shape.
Detailed Lines: Fill in the details using the forms as guidelines. Make sure to pay attention to the weight and flow of the hair.
Rendering: Darken in regions of the hair while leaving highlights, there are a variety of approaches so feel free to experiment and see what you like.
Quickly learn the basics of drawing faces and start having fun with this simple drawing course designed for beginners!
This Course Includes:
✓ Over 14+ hours of video content!
✓ 35 Video Lessons!
✓ 35 Printable Reference Sheets!
✓ Real time video with voice over!